Sunday, April 29, 2012

island time


Well now that the mammoth range is in place I felt it was safe to move the island back into the kitchen , time to extend the island and to make it pretty . What we started out with was a standard depth base cabinet , three doors wide . A good starting point , but we found it a bit wee for this kitchen. We had a huge and very useful island in the old house and we need a good sized island for our busy lives. 
                            
 I started by building a simple cabinet to hold our microwave , we will have an outlet added to this cabinet for the microwave tomorrow. As well we would like to have a second outlet added for my mixers.


 We decided this area was a little too tight for stools , and since we have a table and chairs in this kitchen already we didn't feel the need to crowd up the room with stools. However the island needed to be made wider as well as longer. The over all size will be 35"x65" and standard counter height. I decided to add legs to the back side of the island to create a small 5-6" over hang , not quite enough space for a tucked in stool but enough extra space for a good deep prep space. The legs will be right up against the island no space in between. A little bit of added detail.
I was some how able to squeeze in cladding the island with beadboard and priming and painting the island.

We've come a long way. But still to come are counters , new sink and faucet and gorgeous pendant lights and finished tile and island. There is so much work that goes into a kitchen.

Late night painting session. 

 I will be installing these legs similarly to the photo above.
I decided to do a deeper grey then the main cabinets , I chose a soft gloss finish and the colour is Powder Horn by Para.

We bravely went out to Ikea today and picked up the butcher block counter in beech for the island, I think we are two days to a finished island....

Friday, April 27, 2012

 BEFORE: nothing properly finished off the top of the upper cabinets
 After weighing my options I decided to fill in the space above the fridge all the way to the ceiling
 Pretty straight forward enough , I used MDF
 I thought it would be more interesting to vary the heights on this side of the kitchen, I think that was pretty successful.
 I really need to get some wooden shelves already...
 I added a couple of trim pieces to dress it up and finish it off, then again I paint.

 I've started the extension of the island , this will be for the microwave. I look forward to getting a butcher block top from Ikea , hopefully in the as is dept.
 I went ahead with the shelves painted grey , good choice , thanks for the input.
Don't you love my egg cartons , ceramic, and 94 cents...

I'm just taking a little break watching a little ellen. Enjoy yourself ...

Wednesday, April 25, 2012

smiles from the Kauffman's kitchen

 
I am over the moon today , in fact when these appliances of ours were all installed I couldn't stop smiling. 
I never in a million years thought we could have these kind of appliances , the kind I have drooled over and dreamt of . I am a very lucky girl. 
The installers were really amazing , there are always little bumps in the road . Like the rangehood , I am certainly glad I didn't attempt to install it at all. It was/is heavy and complicated , and now I know it is installed properly. It is so quiet .

 6 beautiful burners, and guess what the installation man showed me that if the burners blow out , say there is a gust of wind from the window and the flame blows out then the burner will automatically re-ignite, awesome. I'm loving that safety feature , especially since gas makes me nervous. I'm sure I'll get used to it and from what I hear I will love it .
 I made some progress on the stairs , painting those risers , that's a lot a fun times. Spindles need some attention too , any takers ????
 In other happy news we are drooling over our beautiful dishwasher , I am so happy I found this model and we got it on sale for an amazing price. Loving the matching handle to the stove. It is a Kitchenaid.
Getting the range and range hood out of the dining room left me enough room to create a functional dining room. I finally had some room to hang the large round mirror we bought each other for Christmas , pretty perfect . I want to install the chandelier but I would regret that during the flooring installations , right .
Future plans for this room are many , including a new round table and chairs , pine floors in a pattern , hanging the chandelier , paint , mouldings and a wooden beam. I am so thrilled to see this room as a room and not a store room . what a great day .

Tuesday, April 24, 2012

on the roll again


 I had to grab my big strong tattoo'd husband to help move the big range into the kitchen , since tomorrow is install day . Although the kitchen is not complete there is no reason to wait any longer for our appliance installation the counter installer said her can work around the appliances so we are happily moving forward. It was simple and painless and easy to move it as well... thanks to a You tube video.
 Why do dogs always want to get in on the action ??? annoying , anyway , I watched a video the other day on how to move appliances without marking or ruining your wood floors. Masonite or hardboard , I picked up three pieces that were 2'x4'. Basically you play leap frog with them and your appliance easily glides right over the boards and saves your floors. Awesome.
 So there it is , at least we have the stove in the kitchen after all this time. No sore backs either .
I want to say thank you for all of the concern about me pushing to hard and hurting myself. I am knocking on 40's door after all and I think that a pulled back is just a part of life at this point, but I am being careful and listening to my body. I am doing as much as I can each day , it's a marathon , there is always tomorrow for more to be done, right. But thank you really for the concerns. I'm good and I thrive while keeping busy and I do put my feet up I swear I do , in fact I am right now .

I installed the rest of the painted doors to this side of the kitchen this morning. What a thrill. I even installed the pulls onto the drawer , my baking drawer.

Tomorrow I will do a little painting , hopefully tackle some sanding and what ever else tickles my fancy. Oh happiness I think I may be able to start emptying out the dining room , that will feel great to de-clutter that very cluttered room.
By for now , time to sleep.

more blogger kitchens to follow

I am not the only one busy building a new kitchen , I am also eagerly following along with these other design  bloggers ,http://ppebble.blogspot.ca/2012/04/kitchen-considered-chapter-3-going-grey.html Kelley at Polished Pebble is also going grey with her cabinets, it going to be a stunning kitchen , http://www.russetstreetreno.com/2012/04/it-was-exhausting.html Sara at Russet Street Reno has created a classic white kitchen she should be very proud of, all while pregnant with her first baby , and Lindsay at Aubrey and Lindsay http://aubreyandlindsay.blogspot.ca/2012/04/kitchen-elements.html are also in the midst of making all the right decisions and embarking on a major kitchen renovation , it will be sure to be a classic and beautiful well planned space , she has decided on quartz counters or has she???


Planning a kitchen is a major job , there are more decision in the kitchen than I think in any other renovation. Floors , cabinet style , cabinet finish , the lighting , the tiles , the details , knobs , the appliances, the layout , the furniture , the counters, the sink , all important decisions and the desire to get it all just right.
 After grouting behind the stove area which was terribly messy I bent down to grab the vacuum cord and pulled something or a lot of things in my back. I'm in pain, so yesterday was much less productive than I had planned. But somehow after some pain medications and muscle relaxers I was able to get these shelves constructed. I laminated two shelf boards together to create a thicker shelf, then I edged the laminated shelf with a 1x2" primed board.I just need to sand then and prime and paint.
Here is the question , now do I paint the shelves white or grey ??? I can change the colour of the brackets. The wall behind will be subway tile. Help your opinions would be appreciated.
 Some doors are being installed but most remain untouched, it's been too cold to get outside and sand, miserable in fact. I hope it will warm up soon.
I did get the grouting behind the hood area completed and we just love it, the grey was the right way to go . The appliance installer had to push back our install to Wednesday , I totally understand that some jobs just take longer than planned , I know mine do. What is another day . I can't wait to see how our stove will look in the kitchen and not in the dining room. I may just get our dining room put together in the near future.

I am feeling my meds working for my back so I will be able to get some things done , I need to see at least a little progress everyday
Bye for now , see you soon.

Monday, April 23, 2012

weekend wonders

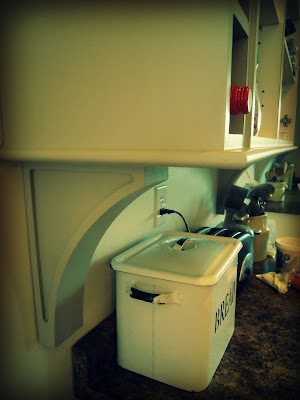
 I love a face frame kitchen but this is not what I have, but I can add character to what I have to make it more interesting. Like the bulkhead and crown moulding, and by adding simple brackets. But how to attach them was a tricky issue. The brackets have a key hole installation , but since my cabinet are in place I can not use that kind of installation. I added  a small valance detail to the bottom of all the upper cabinets. I screwed this 1x2"primed wood with particle screws .
 I then attached a half round trim to the 1x2" boards.
 Easy enough.
 I then glued and nailed 1x3" primed wood to the tops of the brackets so that I could screw them under the cabinets , everything is now flush with the valance and I just had to paint it all grey.
 Problem solved. And I can move them to accommodate the tile. I'm not sure why I installed them all now , I guess I am excited to see how it would all look.


 Next step was adding the tile to the stove area since the range hood is going in tomorrow I needed to get to it already.
The tiling went quite well , since I have a wet tile saw. So well I decided to just keep going and going until my hands felt like sand paper. 
I used large spacers 3/16" for a more contemporary bold look. I used subway tile in the old house so I wanted this installation to be different. Bold grout lines , grey grout and no accent. The stove and hood are the star of this kitchen. I need to also finish the grouting in this area today .
I love how glazed tiles reflect so much light in a kitchen, I chose these tiles from Lowe's, they are a little creamy in colour .

So today I will grout some tile, make some thick shelves for the open shelving by laminating two boards together, and I'm going to tackle some more of the stair painting project. And I will take some time to rest as well , I swear I am pacing myself.
We are adjusting to having the fridge back in the kitchen , this is a welcome change. I still need to make some shelves for the open shelving there. Install the painted doors and drawer to the left of the fridge. Then onto adding a cornice treatment above this area.

Sunday, April 22, 2012

Photo editing and random thoughts

 I have been sad that Picnik was shutting down  , as it was my go to to make my photo's look better and to make collages and such.
But I found PicMonkey yesterday , yeah me , it must be from Picnik because my favourites are there like cross process.

 Still just dirt living ...no grass till it warms up around here , and then plants, trees and a driveway , so exciting , and a fence and not having to walk the dogs constantly, oh heaven. It will be like a whole extra room having a yard again. My husband thinks we need a riding lawn mower , that is going to be a whole lot of grass to cut, we will definitely have to get rid of our corded electric mower that is for sure.
Need to get that island back in here , after the stove and dishwasher are installed Tuesday we can have the island back in , looking so forward to having an island again.  I'm going to tuck the microwave into that island, there is really no where else for it , I don't need to see it , but we use it a lot so it stays. The only place for it is the island. I am building a base cabinet for it . It's going to be an adjustment for everyone , but we don't have little ones so I don't really see any problems.

 We finally got that fridge out of the family room and into the space we created for it weeks ago , I had to finish the floors and top coat them and wait for things to harden up before we moved the heaviest fridges into place. We used carpet scraps under the wheels to move it , even empty it is a monster. The damage to the floor is minimal !!! . Next time we will use Masonite , apparently that is the way to go to protect your floors . Why didn't I check YouTube ??? oh why.                  

 Do you spy anything here, its the edge detail or valance and brackets installed....oh yes oh my. That was tricky installing the brackets.
I am moving on to tiling behind the range hood area today . I took a break yesterday and even went to see a movie with my husband , The Lucky One, it was a good one, sweet , hot and I even may have shed a tear???
Subway tile here I come. Weather man bring me some sun , I have to use a wet tile saw today...

Saturday, April 21, 2012

Painting cabinets part two

BEFORE

AFTER

There are so many options when painting cabinets. You can use oil, if you can find it , or melamine paint but I always use LATEX . I most often use satin finish but I have also used semi-gloss. Once the paint has had time to cure it is quite durable. The satin finish minimizes any flaws and the grain in the oak that I am painting.
Although I wish that I had a large compressor and an air spray gun I used an angle paint brush for the details on the doors and a foam roller.
I do not over load the roller , I use long strokes over and over until it is a nice smooth finish and make sure to correct any mistakes before leaving it alone. Don't mess too much while applying latex paint , it dries very quickly...
After the primer the Zinsser 123 I apply two to three light coats of paint, making sure to allow ample time for drying. I am painting my doors in the basement and with as much light as I could find, the better the lighting the better the overall paint job.
 I have this old metal table frame that I am able to use as a painting stand , it helps prevent some back aches. For the other doors I have found these little bins to be the perfect stand to paint them on.
 I have found that these Rubbermaid containers are perfect for small roller and tray combo's, it keeps the paint fresh between coats, which can take several days. I use a baggie to cover the paint brush to avoid paint skin forming on the brush. It works quite well for the most part but once there is any issue with bits of dry paint forming on the brush or tray I will wash everything out.
For my cabinets that I am currently working on I am using Martha Stewart paint. I am a big fan of Martha paints , the colors are great and the coverage is superior to many other paints, I think I have tried most brands. I have used it on many occassions. I am not quite sure why Home Depot has stopped carrying it. First they had it at Canadian Tire and they discontinued and now Home Depot, I say a big boo.

So that's really all there is to it , I use latex paint in satin and apply two to three coats by brush for the details and foam roller and allow to dry before re-attaching the hinges. I just finished the final coat and I will wait till Tuesday to re-install the door on the one side of the kitchen. I can't wait to see it all together .