Friday, March 30, 2018

Our white wood laundry room makeover


I recently completed a very necessary makeover in our basement...our teeny tiny laundry room...and I mean tiny, the ceiling height is a cozy 6'3...

I had a few must haves on my list for this room...I wanted to stack the washer and dryer if possible so that I could add lower cabinets and our wine cooler....we were able to stack them with less than 1" to spare...I re-located some cabinets from the family room kitchenette to the laundry room and performed some magic to make them look like new custom cabinets and I built new shaker doors...
I found the sink on a re-sale used items site for $20...it wasn't the farmhouse sink I really wanted but this had to be low budget makeover...


 The sink is an Ikea sink...remember $20 used...I really think it works with this room and the modern farmhouse vibe it has...the counter I built from 1.5" pine boards I laminated and stained this light color...which is quite a departure for me...
Since this room is so small and lacks lighting I wanted to just go for it with the color...why not branch out of my comfort zone and try some gorgeous green...and I love it...I used to tell everyone to keep the door closed because the room was an eyesore before....I wanted it to be open door beautiful. 
The wine cooler fits perfectly, my husband thought it was a weird location for it but it works....it usually full of beer...

I saw this print at Homesense during this project and thought it was so sweet...but where would it go??? the day later I couldn't stop thinking about it and it occurred to me that this was the perfect spot for it...and lucky me I went back to find it a couple of days later...


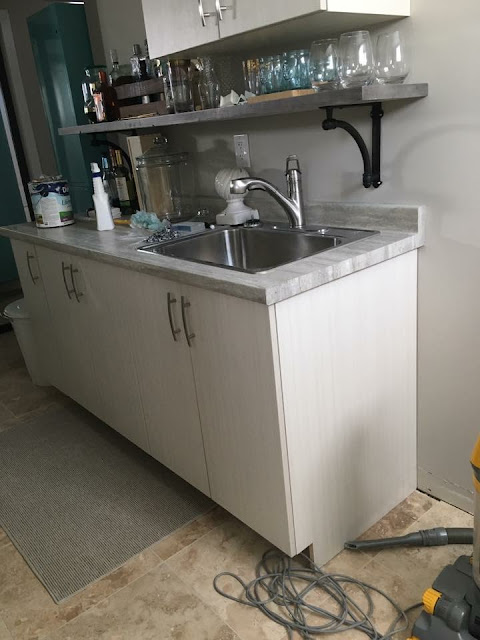
can you believe these cabinets are the re-faced cabinets from this kitchenette below...
a bit of face frame a pretty toe kick and new shaker doors...its like new.


this tile made the biggest impact...although some people have tired of this bold designed tile I love it, its been used around the world for years and has in recent years become very popular...sadly it has been mostly out of reach due to the high cost of cement tiles like these, luckily these ones I found at Lowes for .99 cents a tile...they are really nice, I loved the design and knew they were right for the vibe that I wanted ....they are actually clay tiles...it took me 56 tiles to complete my wall...that was such a bargain...plus I found a forgotten Lowes gift card for $200 that I used to buy the tile and supplies and the gorgeous simple Delta faucet....

I had wanted upper cabinets here but because of the space the lighting location and the sink location uppers didn't work...it would have had too many things off center...that wasn't going to work for me. 
so I nixed the uppers, I bought a double light for the sconce and added a reclaimed wood shelf for decor purposes...I used no more nails to adhere this shelf and decorated it with faux succulents. 


The location of the laundry room is right at the bottom of our stairs from the side entrance right off of our family room.

so we successfully stacked the washer and dryer and framed it in with a gable I made from a cut down sheet of MDF...that was $28 

tiling and supplies...free due to the gift card but would have cost around $80 

this awesome amazon light was $55...

here is the laundry room before...fine but not the pretty room with maximized storage I envisioned...it became a catchall for things that had no place...I hate that.

when we went to stack the dryer we found that plug was about an inch too low....so close...my husband simply moved it up and couple of inches and we were good to go....


I installed a flex hose to the dryer and we were off and running...

here is the old kitchenette on the other wall just outside of the laundry room...it had a redundant sink that was never used and it simply ate up so much space and it was not like anything I would have designed, I considered re-designing it but the longer living with it the more I knew we needed it removed...so we capped off the water lines and removed the whole thing...after doing so it is obvious for us this was the right thing to do...the connections are still there if ever needed...

I just wanted to show you don't have to spend a fortune to create a nice space...you can re-do things and make them what you want and achieve great design without compromise...I now love all the elements of our new laundry room. 

I hope you enjoyed my little laundry room makeover tour, thanks for stopping by. 


Thursday, March 8, 2018

Easy DIY stencilled cement steps...get this bold trendy look for very little

So many people have asked me to share how I stencilled my stairs...so here it is...keep in mind I am rather new to how to posts...but here are the basics...it's a pretty simple project, I promise.

Cement tiles have been around for ages...they can be simple or colorful...but they tend to be very costly and thick and tricky to install... I wanted to add a fun bold design to my side stairs, they were lacking any interest and I had thought tile would be beautiful here...but the thickness of the tiles would not work...so stencilling was the obvious choice...it requires very little skill and cost are minimal...and it requires no real commitment.

When I posted this photo recently on instagram it immediately blew up...I have never seen so many positive comments and likes, re-posts and tags...it blew me away, so it is clear I am not the only one loving this look...is it cutting edge...no...does it have to be...no...is it fun and dynamic...heck yes.


The best place I found for the stencil was through etsy...I was able to order the size I needed to for my steps...I wanted it to be bold but not busy so I carried to pattern between two steps...


the stencil is a quarter of the design, you can get a whole design if you have a larger tile look.

 I picked up some hardboard from Home Depot and had them cut it down to 6" strips then I made adjustment to fit the different dimensions of my steps...primed them and sanded them then applied two coats of trim paint, then I started stencilling...I started from the center and worked my way out...it took a while because after I had stencilled every other one in that one direction I had to let the stencil dry to flip it and use the other side...it's simple enough but you have to pay attention to where you are with the design...this job took 3 hours on and off to complete 8 steps...
I used black craft paint and I used a very little on a low pile small roller 
I am so in love with this black and white bold yet simple grapahic design...it may be a very popular design making it a trend but when you stencil it it will be easy enough to change in the future...
Above this is the tile I will be installing in our laundry room...it is only .99 cents per tile...that is pretty amazing

.99 cents a tile.at Lowes.....I can see why I am seeing this look so much more, when it becomes more accessible 
it's a good thing...beautiful things shouldn't only be available for only those with a large budget.

I suppose it would be safer to stick with something more timeless to avoid it being trendy but then things can become too safe...bland and homogenized and who wants that...there is enough of that. 
Do what you love to create the home you love...


time for some laundry room love

Hi friends, its been a while but I have some fun design news to share...our laundry room is getting some serious love out of pure desperation...here is a little mood board to show you the style I am going for...simple...clean and a touch of modern farm house to blend with our whole house.

My goals:

to create a highly functional space

to create a visually appealing space

to max out storage

to create ample counter space 

to make room for a wine cooler 

to create hidden garbage storage 

to create hidden bottle recycling

to achieve this all on a very tight budget 


 It has been a difficult time to blog...recently my laptop crashed...I lost every bit I had saved and sadly I did not have anything backed up...stupid me, I know...
But anyway, it has meant it has been difficult to get back after switching to a MAC...its a real learning experience and I feel a bit lost.


 I quite miss having a nice finished laundry room...like this one in our last home.
 It all started out pretty bland with no storage, just potential, we added the upper cabinet from our kitchen.

 A couple of weekends ago I moved our washer and dryer position so that we could access the machines properly, for over a year the doors opened on the same side which made doing laundry a complete pain...I honestly didn't think I could swap their position myself in such a tight spot but I did it and switched to the door on the dryer so that it opened to the right and the washer to the left...it was pretty exciting...but it became clear we needed to stack these machines if at all possible to allow for more cabinet space...that was easy enough. I picked up a LG stacking kit from Lowes for $68 we had less than an inch to spare but it worked...we were stacked, and yes even I can reach...I'm just over 5' tall and reaching the dryer knobs is not a problem.
 The only problem was that the pug for the dryer was installed as close to the floor as possible, we needed to raise it up by an inch...that was simple enough of an adjustment and we were off and running.

                                                 Attached a new flex hose and that was it.
We have one oddly placed wall light and very low head room, its about 6'5" in there...I can't move the light because of the plumbing in the wall so I have to just live with it where it is, so I opted for this light that can be adjusted simply...it is from Amazon and it has two lights, two lights are better than 1.


I have decided to use this gorgeous tile it's .99 cents a tile, this laundry room doesn't have much going for it so I wanted to make sure the style factor is high...and I am hoping it will be so pretty I will insist the door will stay open...I found a gift card for Lowes so the tile and faucet and a few misc things ended up being free...so what a great surprise for my budget which is what allowed me to move ahead suddenly. 

I found this simple clean Delta faucet for only $74 at Lowes on clearance, it is perfect...in my dreams I would love a brass faucet for this room but I don't have the budget for dream choices... but down the line I can always upgrade...right?

I removed the laundry tub...I don't like laundry tubs I find them bulky, too deep and a waste of space, they don't allow for storage besides pushing things underneath...we can do better than that, in our last laundry room I built a simple sink cabinet with a simple diy door.
Back to this sink...what I really wanted was the ikea apron front single bowl sink but it seems to be impossible to find online...is it gone? well I wanted a white sink that is for sure, I came across this ikea sink, second hand for $20 with a faucet....I'm tossing the faucet but a sink for $20...win win...

here is that post 

In our last laundry room I also built a diy pine counter...and this is the plan for our current laundry room, it will be a lighter stain but I am excited to do this again, I love to work with wood and nothing is as budget friendly as a diy pine counter.


here is that post 


a. urban grace b. unknown c. studio mcgee d. unkown

 I wanted to have some fun with color on the cabinets, I had it narrowed down to these four options....why not be bold...although white is lovely too....
photo Studio McGee


This beautiful green was the winner, I have been embracing touches of green for a while now and one of my favourite designers Erika Powell of Urban Grace uses so much delicious green and I have always wanted to try adding green to a fixed piece in my home, and this will be the perfect spot...

I have selected Basil by Sherwin Williams...I'm really excited to get this complete.

                                                      I'll keep you posted with the progress.

Current break down of costs:
$68 stacking kit
$45 light
$20 sink
free cabinets I relocated
free faucet $74
free tile $81
$60 misc dryer hose