Showing posts with label DIY. Show all posts

Thursday, March 8, 2018

Easy DIY stencilled cement steps...get this bold trendy look for very little

So many people have asked me to share how I stencilled my stairs...so here it is...keep in mind I am rather new to how to posts...but here are the basics...it's a pretty simple project, I promise.

Cement tiles have been around for ages...they can be simple or colorful...but they tend to be very costly and thick and tricky to install... I wanted to add a fun bold design to my side stairs, they were lacking any interest and I had thought tile would be beautiful here...but the thickness of the tiles would not work...so stencilling was the obvious choice...it requires very little skill and cost are minimal...and it requires no real commitment.

When I posted this photo recently on instagram it immediately blew up...I have never seen so many positive comments and likes, re-posts and tags...it blew me away, so it is clear I am not the only one loving this look...is it cutting edge...no...does it have to be...no...is it fun and dynamic...heck yes.


The best place I found for the stencil was through etsy...I was able to order the size I needed to for my steps...I wanted it to be bold but not busy so I carried to pattern between two steps...


the stencil is a quarter of the design, you can get a whole design if you have a larger tile look.

 I picked up some hardboard from Home Depot and had them cut it down to 6" strips then I made adjustment to fit the different dimensions of my steps...primed them and sanded them then applied two coats of trim paint, then I started stencilling...I started from the center and worked my way out...it took a while because after I had stencilled every other one in that one direction I had to let the stencil dry to flip it and use the other side...it's simple enough but you have to pay attention to where you are with the design...this job took 3 hours on and off to complete 8 steps...
I used black craft paint and I used a very little on a low pile small roller 
I am so in love with this black and white bold yet simple grapahic design...it may be a very popular design making it a trend but when you stencil it it will be easy enough to change in the future...
Above this is the tile I will be installing in our laundry room...it is only .99 cents per tile...that is pretty amazing

.99 cents a tile.at Lowes.....I can see why I am seeing this look so much more, when it becomes more accessible 
it's a good thing...beautiful things shouldn't only be available for only those with a large budget.

I suppose it would be safer to stick with something more timeless to avoid it being trendy but then things can become too safe...bland and homogenized and who wants that...there is enough of that. 
Do what you love to create the home you love...


time for some laundry room love

Hi friends, its been a while but I have some fun design news to share...our laundry room is getting some serious love out of pure desperation...here is a little mood board to show you the style I am going for...simple...clean and a touch of modern farm house to blend with our whole house.

My goals:

to create a highly functional space

to create a visually appealing space

to max out storage

to create ample counter space 

to make room for a wine cooler 

to create hidden garbage storage 

to create hidden bottle recycling

to achieve this all on a very tight budget 


 It has been a difficult time to blog...recently my laptop crashed...I lost every bit I had saved and sadly I did not have anything backed up...stupid me, I know...
But anyway, it has meant it has been difficult to get back after switching to a MAC...its a real learning experience and I feel a bit lost.


 I quite miss having a nice finished laundry room...like this one in our last home.
 It all started out pretty bland with no storage, just potential, we added the upper cabinet from our kitchen.

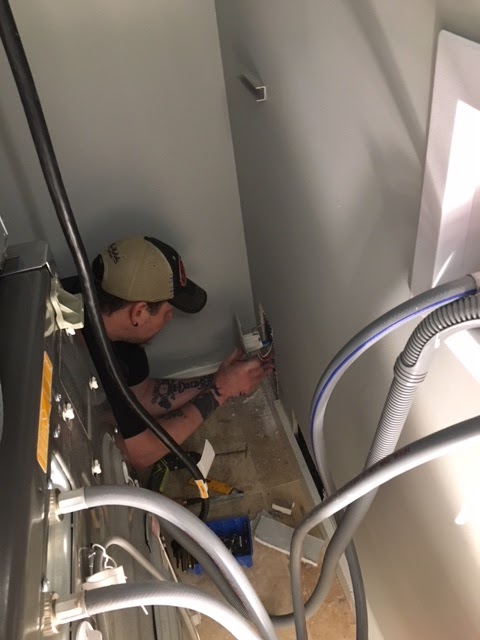
 A couple of weekends ago I moved our washer and dryer position so that we could access the machines properly, for over a year the doors opened on the same side which made doing laundry a complete pain...I honestly didn't think I could swap their position myself in such a tight spot but I did it and switched to the door on the dryer so that it opened to the right and the washer to the left...it was pretty exciting...but it became clear we needed to stack these machines if at all possible to allow for more cabinet space...that was easy enough. I picked up a LG stacking kit from Lowes for $68 we had less than an inch to spare but it worked...we were stacked, and yes even I can reach...I'm just over 5' tall and reaching the dryer knobs is not a problem.
 The only problem was that the pug for the dryer was installed as close to the floor as possible, we needed to raise it up by an inch...that was simple enough of an adjustment and we were off and running.

                                                 Attached a new flex hose and that was it.
We have one oddly placed wall light and very low head room, its about 6'5" in there...I can't move the light because of the plumbing in the wall so I have to just live with it where it is, so I opted for this light that can be adjusted simply...it is from Amazon and it has two lights, two lights are better than 1.


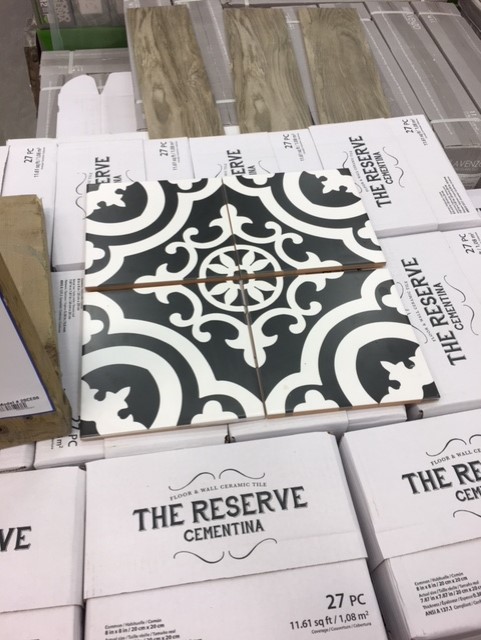
I have decided to use this gorgeous tile it's .99 cents a tile, this laundry room doesn't have much going for it so I wanted to make sure the style factor is high...and I am hoping it will be so pretty I will insist the door will stay open...I found a gift card for Lowes so the tile and faucet and a few misc things ended up being free...so what a great surprise for my budget which is what allowed me to move ahead suddenly. 

I found this simple clean Delta faucet for only $74 at Lowes on clearance, it is perfect...in my dreams I would love a brass faucet for this room but I don't have the budget for dream choices... but down the line I can always upgrade...right?

I removed the laundry tub...I don't like laundry tubs I find them bulky, too deep and a waste of space, they don't allow for storage besides pushing things underneath...we can do better than that, in our last laundry room I built a simple sink cabinet with a simple diy door.
Back to this sink...what I really wanted was the ikea apron front single bowl sink but it seems to be impossible to find online...is it gone? well I wanted a white sink that is for sure, I came across this ikea sink, second hand for $20 with a faucet....I'm tossing the faucet but a sink for $20...win win...

here is that post 

In our last laundry room I also built a diy pine counter...and this is the plan for our current laundry room, it will be a lighter stain but I am excited to do this again, I love to work with wood and nothing is as budget friendly as a diy pine counter.


here is that post 


a. urban grace b. unknown c. studio mcgee d. unkown

 I wanted to have some fun with color on the cabinets, I had it narrowed down to these four options....why not be bold...although white is lovely too....
photo Studio McGee


This beautiful green was the winner, I have been embracing touches of green for a while now and one of my favourite designers Erika Powell of Urban Grace uses so much delicious green and I have always wanted to try adding green to a fixed piece in my home, and this will be the perfect spot...

I have selected Basil by Sherwin Williams...I'm really excited to get this complete.

                                                      I'll keep you posted with the progress.

Current break down of costs:
$68 stacking kit
$45 light
$20 sink
free cabinets I relocated
free faucet $74
free tile $81
$60 misc dryer hose

Thursday, February 15, 2018

Our DIY range hood cover

 I'm so pleased to have completed the biggest feature of our kitchen...with our kitchen being open to our living room I wanted it to look as good as it could and to suit the country home vibe of our church conversion home...for me a feature range hood was the right choice...it was something I could easily tackle on my own and therefore do very affordably...this range hood cost approx $100 to build...


I have yet to add the shelves to the left of the window to complete the bulk of the kitchen makeover...but they brackets are ordered....I have had to tackle this makeover in little bits because our budget is non existent to be honest...if there's a few bucks or some material I pluck away at something on my list...after a year I am happy to say I am really loving my kitchen, although it is not exactly what I would have selected overall it is looking really good and we are happy. 

This is the view from the stairs leading to the basement...

I still need to fill in the space above the cabinets to hide the venting and add crown moulding. The plan is still to paint the cabinets white and to change out the hardware...changing out the hardware is $$$ so that will wait till I can fill the holes and paint the cabinets this spring.
The range is 30" wide and the range hood now is 37.5" wide now. 

I used a piece of reclaimed lumber as an accent on this piece which ties it in perfectly to our island counter.

I stained it with minwax driftwood, then rubbed on classic grey, and accented with a little bit of ebony here and there and then I used minwax ultimate floor finish to seal it, in matte. 

Here was the plan...I wanted the taller cabinets flanking the range and a custom hood...the design changed a little before it came to be. 

Here is how it looks from underneath...I decided to save money and to make things easier and just keep the vent we had, it is a great hood and works well but it just wasn't the design I liked...so I simply left a 1" gap in the front to allow for use to access the buttons, it works just fine. 
I don't have a tutorial but I can explain how I made this cover, I built the sides first, I glued and nailed my design onto 1/2" plywood, then I connected them with wood both on the front and one piece on the back to act as the brace. 

I had to cut out a spot for the vent to slide over the venting.


I then took to my instagram stories to see if I should paint or stain, I had originally thought white but then I thought maybe stain... then painting became a good option...so after a lot of considering we decided to go with stain because if we didn't love it we, and I mean I could always paint it... but we love it stained so we are happy we tried that out, the people were right. 

The first step was to remove the cabinets I didn't want so that I could deal with and make the tile adjustments, the opening was 7.5" wider than originally there so I needed to cut out and replace about 8 tiles...that was not so fun but it had to be done. The cabinets we removed will be used in the laundry room and or the garage. 

On the Saturday morning, we removed the cabinets and the range hood

on the Sunday
I love the wider space above the range...the proportion feels better to me, the tiles were added and fixed and grouted, the cabinets were installed and the valance was re-installed.

Sunday evening...we managed to get the range hood back up...success

Just a reminder of how it looked before I made changes...its nice but it just wasn't me....
Before we touched it. 

More to come when the shelves go up and the painting is completed...

thanks for stopping by...


Tuesday, January 2, 2018

Kitchen planning and my top 10 counter top worthy toaster round up high/low

When we moved here to White Wood we had always planned to make some design changes to the kitchen...first let me say that our kitchen is a nice kitchen it is good quality and features a lot of good design, we have a quartz counter and good solid cabinets with nice drawers and pull outs, it is easily the best kitchen from a starting point that I have started with, it's not builder basic at all....but that being said it still isn't my vision of how I would like my kitchen to look, kitchens are so personal...
We do not have funds to make major changes and that isn't necessary...I just want to tweak things and my plans will likey just cost me some sweat equity...as low budget as they get.
We have currently updated the island base with shiplap base trim and paint as well we re-finished the wood reclaimed top...these changes made a huge difference to the look of the kitchen.


Making these changes seems to have toned down the orange that was so very dominant. Our next plans are to remove the modern range hood, it is a good range hood but it is much more modern than my personal style...so I will build a new wood hood cover with some shiplap and reclaimed wood and fan insert with the funds from selling this current range hood. I will also remove the cabinets flanking the range and relocate and use them into the laundry room. I will then replace them with the other closed cabinets that used to flank the sink and add more open shelving to the left of the window. 
The other cabinets are more narrow than the current cabinets so this will allow me more room to add in a wider more prominent range hood to create more of the feature look I am after, especially since out kitchen is so prominent in our great room I want it to be a really beautiful kitchen, a farmhouse style kitchen. 

I have been looking for inspiration for my new hood design, I love these two photos I found on Pinterest, there is almost too much inspiration on pinterest. 


LINK to Pinterest 

Link to pinterest 


There has been a lot of talk around the blogger/instagram world about pretty toasters... and since we keep our toaster out all the time I was feeling we needed an upgrade...I was really loving the Smeg toaster in white or cream but it was out of my price range...I went on the search for the perfect toaster for us...it was difficult to choose honestly...I wanted a four slice toaster as we had only had a 2 slice toaster before and with a family of four it takes forever to toast enough for all of us...


 I am going to rate this toaster 5 stars , it is not only pretty but works very well...I love the bagel setting. 

In my quest to find the perfect toaster for our open concept kitchen I found these ones and they were strong contenders as far as design... here is my round up of my top 10 favourites I found on Amazon... they range in price from $39.00-$500.00 


                                                 1 | 2 | 3 | 4 | 5 | 6 


                                            7 | 8 | 9 | 10


This Back to Basics toaster was my go to toaster for years and years, I have bought these for family  one Christmas because I loved them so much... I love breakfast food in general, it is my weakness, and this has been an amazing toaster, it boils eggs in three ways, makes poached eggs also, it's great... but its not the prettiest toaster and I have no space or time to be putting away a toaster, for me toasters get some counter real estate, this has always been a function over form thing but now that our kitchen is on display every day I wanted a good looking toaster that will obviously function well for our needs... so it got retired and replaced with the classic white and chrome cuisinart and a new egg cooker...but I would still highly recommend this toaster.

I purchased the elite egg poacher Back to Basics toaster margin: 0px !important;" width="1" /> poacher to replace the egg feature of our old toaster, because these little cookers are amazing at perfectly cooking a medium boiled egg...this little guy can cook up to 7 boiled eggs, two poached eggs and one 3 egg omlete...

Back to the kitchen changes....these will take place in the spring, I am feeling very much in hibernation mode although I will likely tackle a small closet  re-do over the winter if I can find time.


* this post contains affiliate links , purchasing items using these links will not cost you anything extra, but simply helps me to cover cost associated with running this blog, for years I have been purchasing items from Amazon for my personal use and have always has great experiences.